Surface Curve Protocol
Revised: 8/14/01
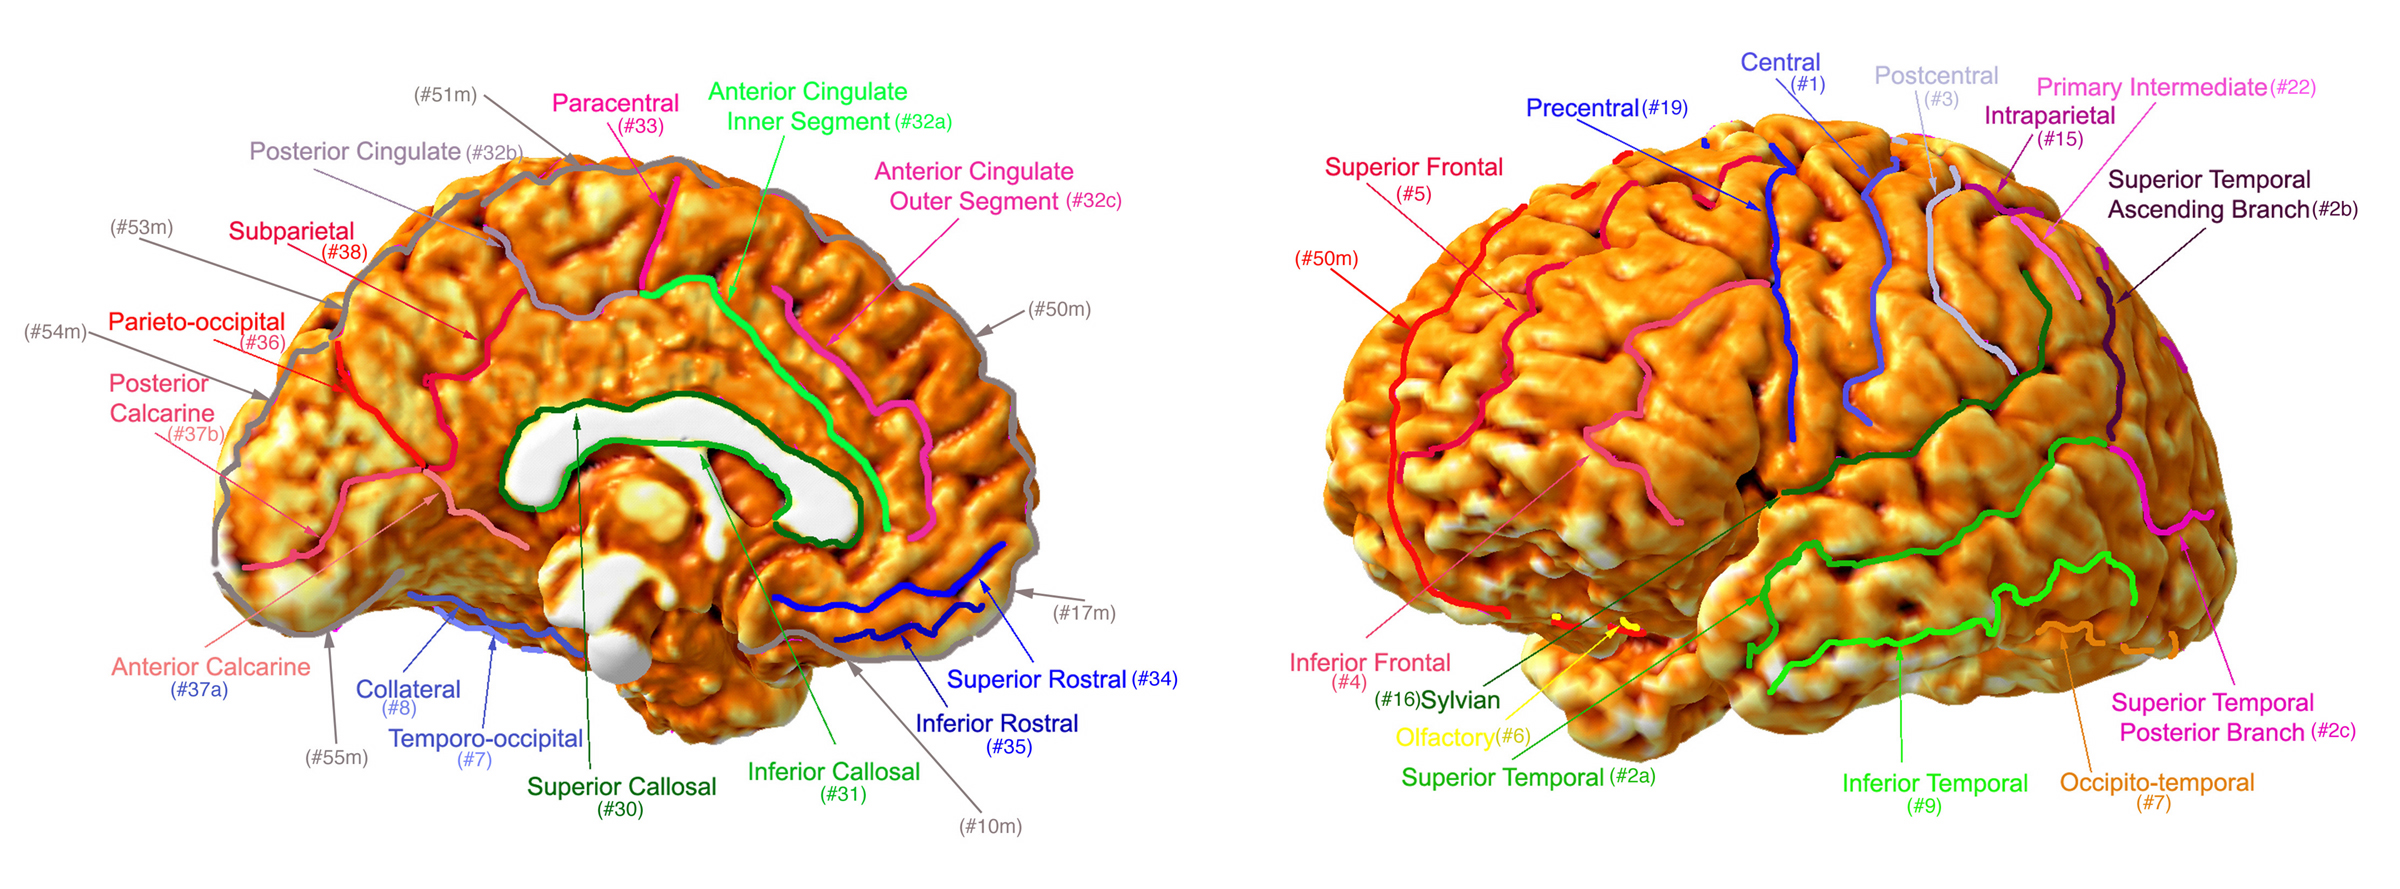
Draw Sulci/Lines in the Following Order:
- Sylvian Fissure (#16)
- Central Sulcus (#1)
- Postcentral Sulcus (#3)
- Precentral Sulcus (#19)
- Superior Temporal Sulcus Main Body (#2a)
- Superior Temporal Sulcus Ascending Branch (#2b)
- Superior Temporal Sulcus Posterior Branch (#2c)
- Intraparietal Sulcus (#15)
- Primary Intermediate Sulcus (#22)
- Secondary Intermediate Sulcus (#20)
- Transverse Occipital Sulcus (#21)
- Inferior Temporal Sulcus (#9)
- Inferior Frontal Sulcus (#4)
- Middle Frontal Sulcus (#5)
- Olfactory Sulcus (#6)
- Occipital-Temporal Sulcus (#7)
- Collateral Sulcus (#8)
- Olfactory Control Line (#10)
- Olfactory-Middle Frontal Control Line (#17)
- Middle Frontal-Precentral Control Line (#11)
- Precentral-Central Control Line (#18)
- Central-Postcentral Control Line (#12)
- Postcentral-Transverse Occipital Control Line (#13)
- Occipital Control Line (#14)
General Guidelines
Before drawing
- Set the surface curve weight to -50 ("V" for surface curves from the main menu, and then "X" to set the curve weight.
- Generally, but not always, determining the shape of the sulcus in the opposite hemisphere can aid decisions when the pathway is ambiguous.
- Start by determining all the sulci in a region. Once you have figured out their paths, then draw the sulci for that region.
- *ALWAYS plan the drawing of the sulcus in same direction you will actually draw in (especially helpful for Frontal Sulci).
- Rely more on the object view than the reslice view, but the reslice view is helpful in determining which path to take.
Drawing
- Try to think of the area you are defining with the sulci you draw. This will help you when the sulcus is ambiguous.
- When the path a sulcus will take has been decided, use the markers function ("B" for markers menu, then "F" to create a marker where the cursor is located) to note the starting and ending points of the sulcus. All starting and stopping points must be chosen in orthogonal views. Then rotate the object file so that you can see down the length of the entire sulcus (You must be able to clearly see the beginning and ending markers).
- If presented with 2 equally good opportunities to jump when drawing any of the sulci, always jump sooner than later
- Generally, choose the shortest direct route between start and termination points for each sulcus. Do not jump gyri unless the sulcus is clearly discontinuous, and follow all twists and turns of each sulcus when it is an unambiguous path. If you must jump a gyrus, always choose the shortest distance and do not select points on the gyrus. Specifically, when you come to the last point before you must jump, just choose that one point on the other side of the gyrus (shortest distance possible) where you will draw the continuation of the sulcus.
- Starting points for all sulci tend to be in deepest, darkest contrast sulcal area whereas an ending point can have less contrast if the sulcus is continuous.
- If the sulcus is not present (most notably 22 and 2c), do not draw it.
The Sulci
16. Sylvian Fissure
Starting Point: Point on object where temporal lobe separates from frontal lobe
Direction: Anterior to Posterior
Ending Point: Nestled inside the supramarginal gyrus
Notes: Follow the natural course, do not pass over any gyri. You will not need to rotate the object. Sylvian moves superior as it moves posterior. The anterior end almost always starts anterior to, or directly at, the inferior extent of the precentral Sulcus. Always confirm your sulcus choice in the coronal slice view. Occasionally, Sylvian moves dramatically superior, sometimes interfering with the designation of the postcentral sulcus. In these cases (for example, case?), follow the Sylvian Fissure, but do not draw superior to Intraparietal sulcus. Then draw postcentral ending at superior extent of the Sylvian. Use axial and saggital reslice views for assistance, but ultimately use the object view for decision. When there are two paths to choose from at the posterior extent, always take the more superior route (as seen in case 102812).
References: Figure 16
1. Central Sulcus
Starting Point: Top view, close to midline.
Direction: Superior to Inferior
Ending Point: Side view, superior to Sylvian fissure
Notes: Generally unambiguous. The axial view can be helpful because the sulcus has a characteristic bend (moving lateral bends to the anterior. See Figure 1a). Do not cross over any gyri as you move inferior. The superior extent tends to curve posterior as it moves towards midline.
References: Figure 1
3. Postcentral Sulcus
Starting Point: Top view, just behind the Central sulcus, near midline
Direction: Superior to Inferior
Ending Point: Superior to the Sylvian fissure
Notes: Always first identify the postcentral sulcus in superior axial view, as it is always the sulcus just behind the central sulcus at the superior extent. There is often a small extra sulcus between the central and the postcentral near the Sylvian at the inferior extent of the sulcus (see case 10792, 2137, 102812). If this extra sulcus is present, take the posterior route (tends to intersect directly into Sylvian Fissure in these cases). If the superior extent of the sulcus is not continuous up to the midline, always choose the posterior extent (e.g., not anterior towards the central sulcus) using the following guidelines: move posterior when you reach the most superior bifurcation from the midline. Almost always ends in an insular type sulcus. Do not jump sulci, unless you have no other options.
References: Figure 3
19. Precentral Sulcus
Starting Point: Near midline, in top view
Direction: Superior to Inferior
Ending Point: At or near Sylvian fissure
Notes: Frequently discontinuous in the middle of the sulcus. This sulcus should be just anterior to the central sulcus. The middle frontal terminates on the precentral, which can give you a clue. The most superior extent ends towards the midline and it runs generally parallel to the central sulcus. If there is a superior fork, take the anterior route, staying relatively parallel to the central sulcus. Staying parallel should take priority over sulcal continuity if it veers dramatically anterior (rough guideline: if the sulcus angles > 45 degrees anterior, then don’t go that way). If there is a choice between two different routes at the inferior aspect, always take the more anterior path unless the other is clearly more continuous.
References: Figure 19
2a. Superior Temporal Sulcus Main Body
Starting Point: Furthest anterior high-contrast point in temporal pole
Direction: Anterior to posterior
Ending Point: Temporal-Occipital Notch, or the anterior occipital sulcus, which ever is more anterior (see Duvernoy, p9, #23).
Notes: Coronal slice view can be helpful in determining the pathway. As a general rule, the Superior Temporal sulcus tends to parallel the Sylvian Fissure and the inferior temporal (but not in all cases). The anterior termination point of the inferior frontal sulcus (as seen in the axial view) is always near the junction with the superior temporal gyrus. Do not interfere with the drawing of 2b. Note that if there is no occipital temporal sulcus available for a stopping point, use cross hair from temporo-occipital notch for a guide.
References: Figure 2a
2b. Superior Temporal Sulcus Ascending Branch
Starting Point: Superior Temporal sulcus main body bifurcation
Direction: Inferior to Superior
Ending Point: Inside the angular gyrus
Notes: Do not draw the sulcus higher than the most superior aspect of the supermarginal gyrus. You might have to cross over a gyrus to complete the sulcus. It will often run very close to the Sylvian, but can also move back towards the occipital lobe. Runs between the secondary intermediate and the primary intermediate sulcus. Do not interfere with 22.
References: Figure 2b
2c. Superior Temporal Sulcus Posterior Branch (horizontal posterior segment of the parallel sulcus, Duvernoy, p8 #19)
Starting Point: Posterior extent of superior temporal sulcus, main body
Direction: Anterior to Posterior
Ending Point: Most posterior high contrast point closest to the junction of the Intraparietal and transverse occipital sulci.
Notes: This sulcus may not always be present, but when it is make sure to draw it along the path of least resistance. Occasionally this sulcus runs into the temporo-occipital sulcus, if so, stop there.
References: Figure 2c
15. Intraparietal Sulcus
Starting Point: Post central sulcus
Direction: Anterior to Posterior
Ending Point: Transverse-occipital sulcus
Notes: Always a T-intersection at the anterior extent with Post Central (when it requires jumping a gyrus, take the path closest to the apex of the supramarginal gyrus). When the posterior/inferior extent is ambiguous, take the inferior extension (not part of post central sulcus). The Intraparietal sulcus always has a ½ Y shape relative to the midline.
References: Figure 15
22. Primary Intermediate Sulcus
Starting Point: Apex of supramarginal gyrus at the intraparietal, or occasionally at the postcentral sulcus
Direction: Superior to Inferior
Ending Point: End of the sulcus or far enough down to contain the supramarginal gyrus. If it forks at the inferior extent, stop at the intersection.
Notes: It will hug the posterior border of the supramarginal gyrus. Never continue the sulcus all the way to the superior temporal. It is all right to jump a gyrus to get to the primary intermediate sulcus. If, at the inferior portion of the sulcus, you have a choice between moving inferior and moving anterior, move in the anterior direction. If the only way to draw the sulcus is off the post central, then do so. This sulcus may not always be present.
References: Figure 22
20. Secondary Intermediate Sulcus
Starting Point: Intraparietal sulcus
Direction: Superior to Inferior
Ending Point: End of sulcus
Notes: Offshoot from nearby the middle of the Intraparietal sulcus. It is always the posterior border of the angular gyrus. Never let it interfere with the posterior branch of the post central. Should resemble a "T" as it comes down from the top of the Intraparietal sulcus into the depths of the angular gyrus.
References: Figure 20
21. Transverse Occipital Sulcus
Starting Point: On midline or highest contrast point nearest midline on medial surface of hemisphere. Sulcus frequently branches (y or t intersection) at the midline, stop at the intersection.
Direction: Medial to Lateral
Ending Point: Follow all branches that extend posterior/inferior; insular type sulcus. Stop if you intersect the sulcus lunatus (see Duvernoy, p 16, #11)
Notes: Intraparietal sulcus runs into TOS more than 90 percent of the time. Should start at the most posterior branch at the medial surface (it often forms a Y-intersection with the medial surface of the hemisphere). The sulcus should be continuous and follow all branches that extend posterior/inferior (even if it requires turning medially).
References: Figure 21
9. Inferior Temporal Sulcus
Starting Point: Farthest anterior high contrast point visible in the side object view
Direction: Anterior to Posterior
Ending Point: Temporal-Occipital Notch or insular gyrus if it ends more anterior than the temporo-occipital notch, or end of sulcus intersecting at anterior occipital sulcus.
Notes: Sulcus usually moves into parietal lobe, not occipital. The inferior view of the Inferior Temporal is not much help. It should never exit temporal lobe at inferior surface. Inferior should never finish higher up than Superior or cross it. When you lose the end of the sulcus on the surface view, jump to the closest available sulcus that you can identify as that sulcus without exiting to the bottom of the brain. Note, in this case, you must be able to see the inferior temporal sulcus below your line, or you might be exiting the bottom of the brain. If you hit any intersection that requires you to move back in the anterior direction, stop. It is often necessary to jump a large, ambiguous area to get back to the sulcus.
References: Figure 9
4. Inferior Frontal Sulcus
Starting Point: Most posterior segment of the lateral orbital sulcus
Direction: Anterior to Posterior
Ending Point: Pre Central sulcus
Notes: Frequently discontinuous. Always terminates ON Pre Central Sulcus on posterior end even if you have to jump a sulcus that abuts the pre central. Makes an upside-down "Y" with the Pre Central. The sulcus may be divided from Pre Central by pars opercularis and pars triangularis (see Duvernoy 1). Posterior end determined by taking lowest continuous horizontal sulcus coming off the Pre Central. Always take the inferior route at the most anterior intersection. Often terminates at an insular sulcus. Most anterior extent always ends at most anterior vertically oriented sulcus, e.g. lateral orbital sulcus (see Duvernoy 2). At the anterior end, never jump more than one vertically oriented gyrus before taking intersection in the inferior direction (it is often necessary, however, to jump one gyrus). Note, do not chose a sulcus that curves around the inferior surface of the frontal lobe. If it is ambiguous whether you are actually jumping a gyrus, use the slice view to aid you. Anterior end frequently curves back around to move almost posterior in direction.
References: 1-Duvernoy pg. 9 #12,13; 2-pg. 8, #8?; Figure 4
5. Superior Frontal Sulcus
Starting Point: Highest contrast point closest to midline of the most inferior frontal marginal gyrus
Direction: Anterior to Posterior
Ending Point: On or near the Pre Central
Notes: Do not start the curve at a point that lies on the mesial surface (don?t wrap around-use the axial slice view to help). Choose the most inferior horizontally oriented frontal marginal sulcus even if this requires jumping a gyrus. Further, do not choose a sulcus that appears to lie on the inferior surface of the brain. The sulcus is usually continuous from this point on. If there is a question as to which path to take, take the inferior lateral path. In the event that there appears to be 2 Frontal-Marginal Sulci, take the most continuous route, while generally choosing the most inferior sulcus if possible. Sulcus may bend frequently around small gyri. Use the coronal reslice view to help with ambiguities.
References: Figure 5
6. Olfactory Sulcus
Starting Point: Most anterior extent of sulcus, near the frontal pole.
Direction: Anterior to Posterior
Ending Point: Curve of the sulcus away from midline
Notes: Posterior extent always determined by most posterior extent of the olfactory sulcus as visualized in saggital slice view, and tends to curve away from the midline. Use the inferior axial slice view to determine the anterior extent.
References: Figure 6
7. Occipital-Temporal Sulcus
Starting Point: Most anterior high-contrast point before the temporal pole
Direction: Anterior to Posterior
Ending Point: In occipital pole; highest contrast point near midline
Notes: Is always lateral to the collateral sulcus, and generally runs parallel to it. Choose the highest contrast point nearest the temporal pole regardless of continuity. May require jumping from high contrast point to a definitive sulcus. Use the slice views to help you determine which path to take. Also, never start at any point more mesial than the starting point of the collateral. For any bifurcations, take lateral extent as long as it does not interfere with the inferior temporal. When the double parallel type occurs, always choose the most lateral. May require a jump to the highest contrast point in occipital pole.
References: Figure 7
8. Collateral Sulcus
Starting Point: Level with the pons at its widest lateral extent
Direction: Anterior to Posterior
Ending Point: On midline
Notes: Move laterally from the pons until you reach the most mesial sulcus that can be followed to find the starting point. Bifurcates frequently in more posterior extent; always take mesial route.
References: Figure 8
Guidelines for Drawing the Control Lines
Note, change line-weighting back to 0 before drawing control lines.
Imagine a plane bisecting the inter-hemispheric fissure. Generally, keep the control lines parallel to this plane without veering too far laterally to accommodate gyrification.
Draw lines roughly at the location which best distinguishes the separation between the lateral and medial surface of the hemisphere.
10. Olfactory Control Line
Starting Point: Beginning of olfactory sulcus
Direction: Anterior to Posterior
Ending Point: End of olfactory sulcus
Notes: Draw line just off of midline (about 5mm) on bottom view.
References: Figure 10
17. Olfactory-Middle Frontal Control Line
Starting Point: Most anterior point of olfactory sulcus
Direction: Inferior/anterior to Superior/posterior
Ending Point: Beginning of middle frontal sulcus
Notes: Drawn on front view
References: Figure 17
11. Middle Frontal-Precentral Control Line
Starting Point: Beginning of middle frontal sulcus
Direction: Anterior to Posterior
Ending Point: Precentral sulcus
Notes: Start drawing in front view, end drawing in top view.
References: Figure 11
18.
Precentral-Central Control Line
Starting Point: Precentral sulcus
Direction: Anterior to Posterior
Ending Point: Central sulcus
References: Figure 18
12. Central-Postcentral Control Line
Starting Point: Central sulcus
Direction: Anterior to Posterior
Ending Point: Postcentral sulcus
References: Figure 12
13. Post Central-Transverse Occipital Control Line
Starting Point: Postcentral sulcus
Direction: Anterior to Posterior
Ending Point: Transverse occipital sulcus
References: Figure 13
14. Occipital Control Line
Starting Point: Transverse occipital sulcus
Direction: Anterior to Posterior
Ending Point: Termination of collateral sulcus
Notes: Start drawing in back view; end drawing in bottom view. Do not rotate.
References: Figure 14;
This protocol was created and tested by the following people (whom you can email with any questions or concerns):
Elizabeth Sowell
Michael Mega
Paul Thomson
Chris Zoumalan